Setting up Hammer: Difference between revisions
(Add example GIF for the VRAD differences) |
(Initial edit to adjust for 2.1.2 compiler changes) |
||
| Line 1: | Line 1: | ||
This page will walk you through setting up Hammer++ with | This page will walk you through setting up Hammer++ with our custom tools for TF2Classic map development. | ||
__TOC__ | __TOC__ | ||
== Setting up Hammer == | == Setting up Hammer == | ||
Hammer++ is highly recommended. Valve's Hammer will not display materials correctly without using the [https://www.moddb.com/mods/mapbase/downloads/mapbase-multi-tool Mapbase Multi-Tool] to create a shortcut. This section will guide you through installing Hammer++ instead, which does ''not'' require using the Multi-Tool. | |||
Go to the [https://ficool2.github.io/HammerPlusPlus-Website/download.html download page for Hammer++], scroll down until you find the "Source SDK 2013 Multiplayer" option and click it. This will download a ZIP file. | Go to the [https://ficool2.github.io/HammerPlusPlus-Website/download.html download page for Hammer++], scroll down until you find the "Source SDK 2013 Multiplayer" option and click it. This will download a ZIP file. | ||
| Line 13: | Line 15: | ||
== Setting up your compilation tools == | == Setting up your compilation tools == | ||
A set of | A custom set of compile tools is required in order to have proper lighting on your maps, due to the default compilers not supporting custom shaders, and relying on DX8 models. We use the Mapbase VBSP and Slammin' VRAD which fix both of these problems, along with many other bugs: https://cdn.discordapp.com/attachments/164555395082223616/1134165005286260776/tf2c_compilers.zip | ||
Like with Hammer++, this is an archive you'll need to open and extract. The entire contents of the ZIP file you download should be extracted into your bin folder. This will add vbsp_tf2c and vrad_tf2c executable files, alongside the regular vbsp and vrad files. | |||
After extraction, you will need to configure Hammer++ to use these tools. In the menu bar, click on "Tools" -> "Options..." -> "Build Programs", and adjust the BSP and RAD executable names to add the _tf2c suffix to the binary names. In the end, the paths should end with vbsp_tf2c.exe and vrad_tf2c.exe. | |||
=== Configuring VRAD === | |||
When you're ready to compile your map, you need to make sure that the parameters you're passing to VRAD are supported by our custom build. Some, such as -staticproplighting, are now enabled by default and will produce a RAD error if you include them, causing your map to appear fullbright in-game. | |||
In the "Run Map..."/F9 dialog, you should click the "Expert..." button in the bottom-left corner of the panel to view your configurations, and adjust the parameters for the $light_exe command in the configuration you use for your final compile to be: | |||
-final -hdr -ambientocclusion -aoscale 0.5 -LargeDispSampleRadius -softencosine -worldtextureshadows -translucentshadows -game $gamedir $path\$file | |||
Meanwhile, for fast compiles when prototyping your map, you can simply use: | |||
-fast -ldr -game $gamedir $path\$file | |||
- | |||
[[Category:Guides]] | [[Category:Guides]] | ||
Revision as of 23:55, 5 September 2023
This page will walk you through setting up Hammer++ with our custom tools for TF2Classic map development.
Setting up Hammer
Hammer++ is highly recommended. Valve's Hammer will not display materials correctly without using the Mapbase Multi-Tool to create a shortcut. This section will guide you through installing Hammer++ instead, which does not require using the Multi-Tool.
Go to the download page for Hammer++, scroll down until you find the "Source SDK 2013 Multiplayer" option and click it. This will download a ZIP file.
If you open the ZIP file, you'll find a hammerplusplus_2013mpbuildXXXX folder, which itself contains a bin folder. You should merge the bin folder inside of the ZIP with the bin folder in your Source SDK Base 2013 Multiplayer directory that contains hammer.exe. After that's finished, hammerplusplus.exe and hammer.exe should be in the same folder.
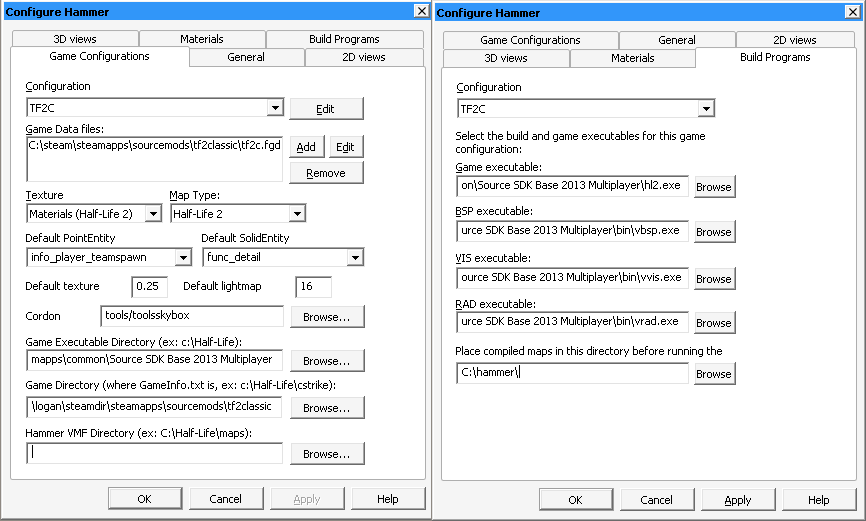
Open up Hammer++ by double-clicking "hammerplusplus.exe". After it's started, in the main interface, go to Tools -> Options -> "Game Configurations" tab -> Click "Edit" next to the "Configurations" drop-down. Add a new one, titled however you like.
Edit this new configuration to point to the TF2C gamedata (the FGD files in the tf2classic folder), the game executable directory (your Source SDK Base 2013 Multiplayer folder), and the game directory (your tf2classic folder, containing GameInfo.txt)
Setting up your compilation tools
A custom set of compile tools is required in order to have proper lighting on your maps, due to the default compilers not supporting custom shaders, and relying on DX8 models. We use the Mapbase VBSP and Slammin' VRAD which fix both of these problems, along with many other bugs: https://cdn.discordapp.com/attachments/164555395082223616/1134165005286260776/tf2c_compilers.zip
Like with Hammer++, this is an archive you'll need to open and extract. The entire contents of the ZIP file you download should be extracted into your bin folder. This will add vbsp_tf2c and vrad_tf2c executable files, alongside the regular vbsp and vrad files.
After extraction, you will need to configure Hammer++ to use these tools. In the menu bar, click on "Tools" -> "Options..." -> "Build Programs", and adjust the BSP and RAD executable names to add the _tf2c suffix to the binary names. In the end, the paths should end with vbsp_tf2c.exe and vrad_tf2c.exe.
Configuring VRAD
When you're ready to compile your map, you need to make sure that the parameters you're passing to VRAD are supported by our custom build. Some, such as -staticproplighting, are now enabled by default and will produce a RAD error if you include them, causing your map to appear fullbright in-game.
In the "Run Map..."/F9 dialog, you should click the "Expert..." button in the bottom-left corner of the panel to view your configurations, and adjust the parameters for the $light_exe command in the configuration you use for your final compile to be:
-final -hdr -ambientocclusion -aoscale 0.5 -LargeDispSampleRadius -softencosine -worldtextureshadows -translucentshadows -game $gamedir $path\$file
Meanwhile, for fast compiles when prototyping your map, you can simply use:
-fast -ldr -game $gamedir $path\$file
