Setting up Hammer
This page will walk you through setting up Hammer for TF2Classic map development.
Basic setup
First, locate your Source SDK Base 2013 Multiplayer folder. Search for it in your Steam library, right-click on it, click "Properties", click "Local files" in the window that appears, then click "Browse". This should open the game's folder, inside of which you should open the "bin" folder. Within this folder is the version of Hammer that we use to create maps for TF2Classic.
Open up Hammer by double-clicking "hammer.exe", and locate the Tools and find the Options button.
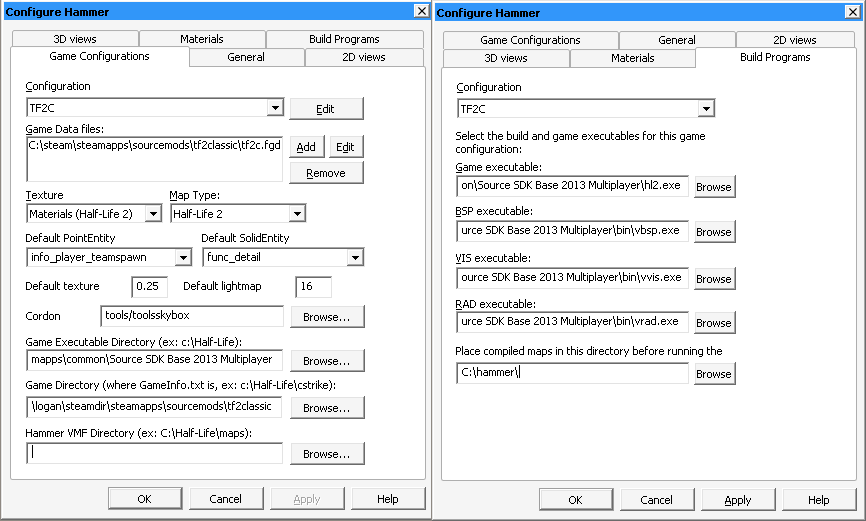
Go into Configuration, and press Edit. From within this menu, press Add, and type in "TF2C".
Select "TF2C" in the Configuration dropdown. You can now set up the Options within both the Configuration and Build Configs tabs.
Hammer++
Instead of using Valve's Hammer, it's possible to use a community fork that adds new features and bugfixes, and this is often especially preferable for novice creators.
Go to the download page for Hammer++, scroll down until you find the "Source SDK 2013 Multiplayer" option and click it. This will download a ZIP file.
If you open the ZIP file, you'll find a "hammerplusplus_2013mpbuildXXXX" folder, which itself contains a bin folder. You should merge the bin folder inside of the ZIP with the bin folder in your Source SDK Base 2013 Multiplayer directory that contains hammer.exe. After that's finished, hammerplusplus.exe and hammer.exe should be in the same folder.
Open up Hammer++ by dobule-clicking "hammerplusplus.exe". It should remember the setup you did in Valve's Hammer, allowing you to choose TF2C as your configuration upon startup. From this point, you should be able to use it as normal, and take advantage of its featureset.
Slammin' Source Map Tools
A set of default compilation tools (vbsp, vvis, and vrad) will come with Source SDK Base 2013 Multiplayer, however you can find better performance and prettier lighting by using the "Slammin" Source Map Tools instead.
At time of writing, you can find the latest version of these tools for TF2C at: https://drive.google.com/file/d/1gqmMkHTadUmWBMOqSPSlKRLL1zYvoRsS/view?usp=sharing
Like with Hammer++, this is an archive you'll need to open and extract. The entire contents of the 7z file you download should be extracted into your bin folder. This will overwrite your existing set of compilation tools, including Valve's Hammer (Hammer++ will be fine).
After extraction, these tools should be used by Hammer/Hammer++ without further configuration. Refer to the thread for more information on which options you can use with these tools: https://knockout.chat/thread/992
TF2C VRAD
A custom version of VRAD is available for TF2C, designed to give a more "old-school" look to the lighting on maps you compile. This version of VRAD is more similar to the one used in TF2 2007, generally being brighter without as dark of shadows. This is mutually exclusive to Slammin's VRAD, you must use one or the other.
To use this, download these two files:
Move them to your "bin" folder, open your Hammer configuration, select TF2C in the dropdown, and in your Build Configurations, set the "RAD executable" to the vrad_tf2c.exe file you extracted. It should then be used on future compiles.
